PDF files are everywhere in the workplace, storing everything from invoices and purchase orders to financial reports and contracts. They are great for sharing information in a consistent format, but not for editing or analyzing it. To work with that data in a meaningful way, especially inside Excel, you need to extract it first.
According to the McKinsey Global Institute, knowledge workers spend nearly 20% of their working week searching for and gathering information. For teams handling large volumes of PDF documents, manual data transfer is a major contributor to that wasted time.
Every hour spent copying figures from a PDF into a spreadsheet is an hour not spent on analysis, reporting, or decision-making.
This guide covers the most effective ways to extract data from a PDF to Excel. Whether you are dealing with one file or thousands, you will find the right approach for your situation.
Key Takeaways
- Manual methods work, but don’t scale – Basic methods like copy-paste or using Microsoft Word can help with one-off files, but they’re time-consuming, error-prone, and not suitable for bulk document processing.
- PDF converters and table extraction tools offer faster results – Tools like Adobe Acrobat or Tabula simplify data extraction, but they have limitations: they only work on native PDFs (not scanned images), usually require manual input, and lack bulk automation.
- Microsoft Excel’s built-in import tool is efficient—but limited – Excel allows direct import from PDFs and works well with clean, structured data. However, it often struggles with formatting and complex tables, especially across multiple pages.
- Automated document processing software handles large volumes, scanned files, and complex layouts with high accuracy and no manual input
- Choosing the right method depends on your document volume, file types, and how frequently you need to extract data
What Is PDF Data Extraction?
PDF data extraction is the process of pulling structured information out of a PDF file and converting it into an editable, analyzable format such as Excel. It applies to both native PDFs (created digitally) and scanned documents, using techniques ranging from manual copy-paste to AI-powered OCR and intelligent document processing software.
Why Extracting PDF Data to Excel is Important
In most workplaces, PDFs are used to store and share critical business information. Invoices, bank statements, purchase orders, contracts, and reports all arrive in PDF format every day. The problem is that PDFs lock that data in place. You cannot sort it, filter it, run formulas on it, or feed it into a dashboard without getting it into a structured format first.
Extracting PDF data into Excel gives your team the ability to:
- Analyze and report: Apply formulas, build charts, and filter data to spot trends and support data-driven decisions
- Automate reporting workflows: Connect structured data to dashboards and reporting systems, eliminating repetitive manual input
- Reduce errors and costs: Manual data entry carries a consistent error rate, and mistakes in financial data carry real consequences. Automating extraction improves accuracy and reduces operational costs significantly
For teams processing documents in volume, this is not a convenience. It is a core operational requirement.
4 Easy Ways to Extract Data from a PDF to Excel
There are many different ways to extract data from a PDF to Excel, but these are the four most common ways to do so:
- Copy and paste
- PDF converters
- PDF table extraction tools
- Direct import in Excel
1. Copy and Paste
The most basic method of extracting data from a PDF file to Excel is to simply copy and paste. This consists of opening the file, selecting the relevant text, and copying and pasting it into an Excel sheet.
This method may be the best option if you only have a few PDF files. But once you have thousands of them, this will most likely result in data entry errors and take up a lot of your time. Furthermore, it is an extremely tedious process.
Copy and paste with Microsoft Word
Copy-pasting data works well in most cases, but sometimes it doesn’t give you the desired results. For example, it’s almost impossible to nicely copy and paste an entire table, including its structure and data, from a PDF to Excel. In such a case, you have to open the PDF file in Word first, and then copy/paste it to Excel.
To make use of this method, you must have Microsoft Word 2013 or a newer version. Then, you need to perform the following steps:
- Open the PDF file by using Microsoft Word
- Copy the content from the Microsoft Word file and paste it into an Excel spreadsheet.
While this method provides reasonable results, it won’t handle complex elements, such as more complicated tables with cell spacing. Besides that, it’s not possible to extract data in bulk as you have to open every PDF file one by one.
2. Using a PDF Converter
If you have to extract data from PDF files to Excel more often, PDF scraping is a good option. This method helps transform PDF files into Excel files in just a matter of seconds.
The process is quite simple: select the PDF file that you wish to convert, upload the file to the PDF converter, and click the convert button. Your file can be converted into an Excel file or other desired formats.
With some PDF scrapers, you can even directly edit text and images in a PDF file and then export them to an Excel sheet.
There are many PDF converters available, but here is a list of some of the best PDF converters on the market:
While a PDF converter may extract data efficiently and quickly, it doesn’t provide data extraction in bulk. You have to upload the PDF files one by one. Also, PDF converters only work with native PDF documents. This means that if you have a scanned paper document saved as a PDF, it’s not possible to extract data from it.
3. PDF Table Extraction Tools
There can be times when you only want to extract table data from an image or PDF. A PDF converter can be your first choice, but it fails to extract the data accurately. Fortunately, other tools can be of great help: table extraction tools.
You can find the five best table extraction tools below:
Most of these tools allow you to draw a box around the table and then extract the data into Excel or other formats.
Something you should consider is that data extraction for tables only works with native PDF files. With most of these tools, you can only upload one file at a time, and you need to select the table that needs to be converted.
Also, in most cases, you would need in-house knowledge to fine-tune a table extraction tool to make it work for your specific use case. In other words, using a PDF table extraction tool is still labor-intensive, hence, not the ideal solution.
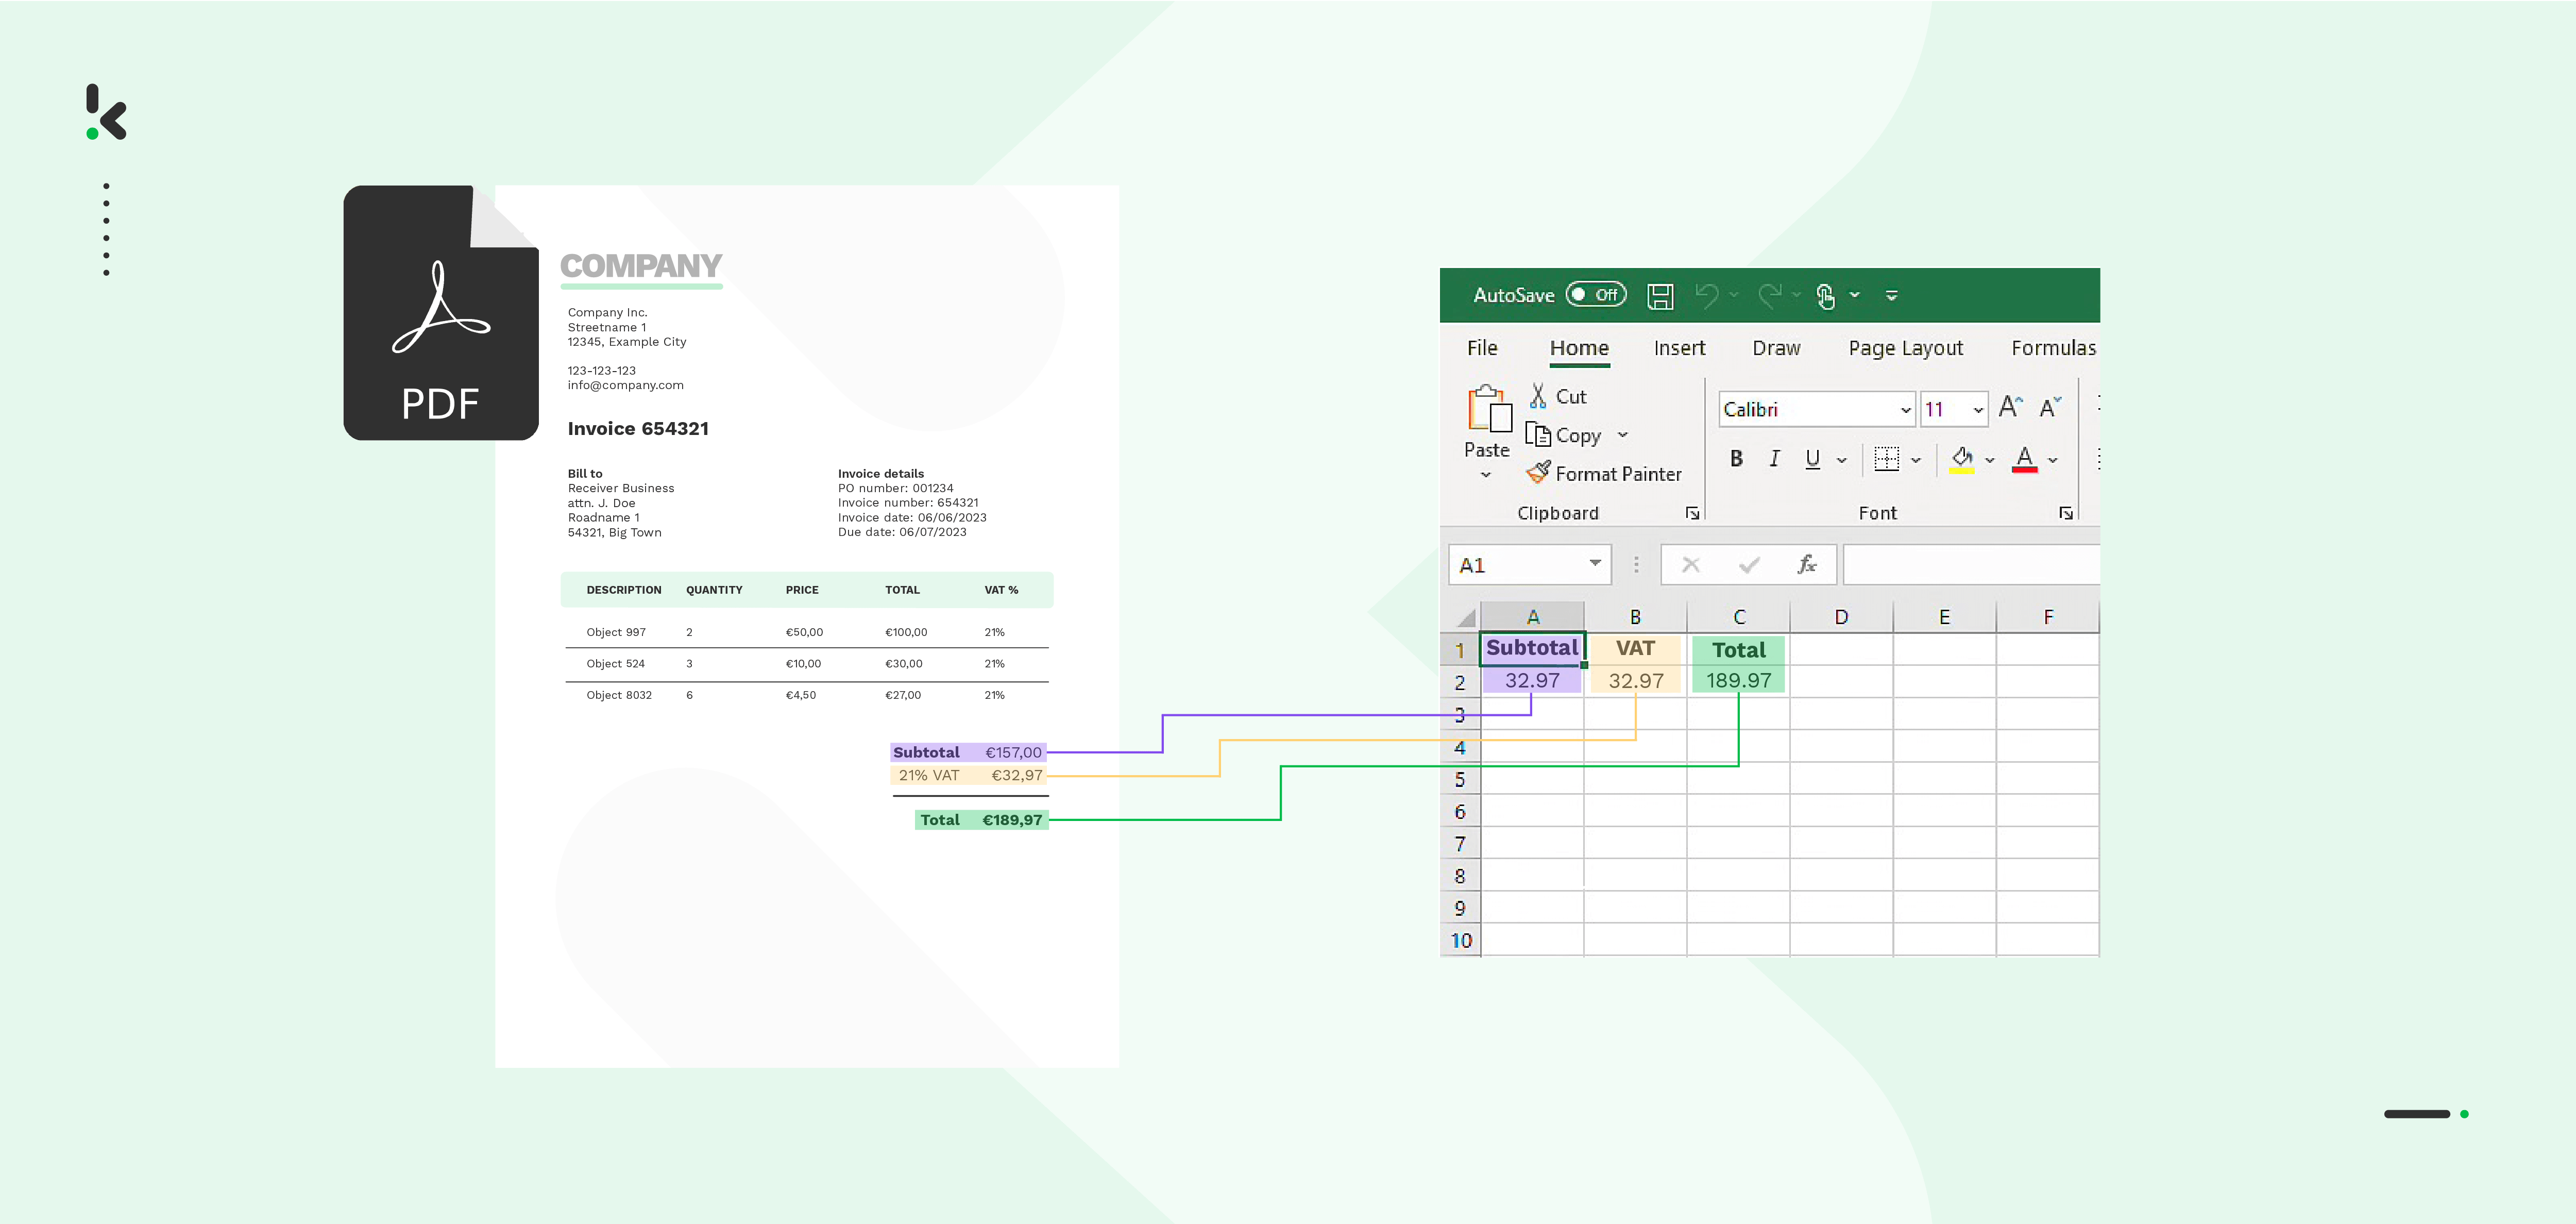
4. Import PDF Data Directly in Excel
Importing a PDF directly into Excel and extracting data from it can also be a good option.
Let’s have a look at the steps:
- Open the Excel spreadsheet
- Select the tab Data > Get data > From file > From PDF
- Select the PDF file and select Import
- Then you will see a Navigator panel with the tables and pages in your PDF, along with a preview
- Select the table and click on ‘’Load“. The table is imported into the Excel sheet.
This method is quite efficient with straightforward data. Complicated data or tables with multiple pages, however, will result in annoying errors in the formatting.
The Pros & Cons of Each Method
Each approach has a different trade-off between ease of use, accuracy, and scalability. Here is a direct comparison:
None of the first four methods is designed for scale. For teams processing large or recurring volumes of documents, automated document processing software is the only approach that eliminates manual effort entirely.
How to Automatically Extract PDF Data to Excel
Manual methods are effective for occasional use, but they do not scale. When your team is handling dozens or hundreds of PDFs, they become slow, inconsistent, and difficult to manage. An automated PDF to Excel workflow processes documents in volume, keeps formatting consistent, and eliminates the risk of human error.
Automation is powered by intelligent document processing (IDP) software, which combines OCR, machine learning, and workflow automation to read your PDFs, extract the data you need, and write it directly into Excel without any manual steps. Here is how the process works in practice.
Step 1: Choose your document processing software
Start by selecting an IDP platform that fits your use case. The key capabilities to look for are OCR support (for scanned PDFs), bulk processing, configurable output formats (including Excel/XLSX), and integration with the cloud storage or systems your team already uses.
Consider your document volume, the complexity of your layouts, and whether you need scanned document support. Some platforms are built for simple, native PDFs; others handle complex, multi-page, or handwritten documents with equal accuracy.
Step 2: Define the data fields you want to extract
Before building your workflow, decide exactly which fields you need from each document. For an invoice, that might be the invoice number, supplier name, line items, amounts, and due date. For a bank statement, it could be transaction dates, descriptions, and amounts.
Most IDP platforms let you configure these fields through a visual interface or a model preset. Defining this clearly upfront ensures your output is structured and consistent across every document processed.
Step 3: Connect your input source
Configure where the software should look for incoming PDFs. Common input sources include:
- Cloud storage folders: Google Drive, OneDrive, Dropbox, Box
- Email inboxes: Documents attached to incoming emails are picked up automatically
- Direct upload: Files uploaded manually or via API
- Business systems: ERP, CRM, or document management platforms via integration
Set up a trigger so that every new file arriving in your chosen source is picked up and processed automatically, without anyone needing to initiate it manually.
Step 4: Extract and validate the data
Once a PDF enters the workflow, the software reads it using OCR (if scanned) or direct parsing (if native), identifies the configured fields, and extracts the relevant values. Most platforms run validation checks at this stage, flagging documents where confidence is low or values fall outside expected ranges.
For high-stakes documents, a human-in-the-loop review step lets a team member verify and correct flagged extractions before the data moves downstream. This keeps accuracy high without requiring full manual review of every file.
Step 5: Map extracted data to your Excel output
Configure the output destination as an Excel file or worksheet. Map each extracted field to the corresponding column in your spreadsheet: invoice number to column A, total amount to column B, date to column C, and so on.
Each processed document adds a new row to the sheet automatically. If you are processing multiple document types, you can route each type to a separate worksheet or workbook, keeping your data organized from the start.
Step 6: Test, publish, and monitor
Run the workflow against a set of sample documents to verify that fields are extracted correctly and data lands in the right columns. Fix any mapping errors, then publish the workflow.
From that point, every new PDF that enters your input source is processed, extracted, and written to Excel automatically. Most platforms provide a monitoring dashboard where you can track processing volumes, review flagged documents, and audit extraction results over time.
Why Should You Use Doxis to Extract Data from PDF to Excel?
Looking to save your PDF data in Excel? We’ve got you covered! With Doxis AI.dp, an advanced intelligent document processing platform, you can easily automate any of your workflows. By leveraging Doxis’ advanced module, you can set up a seamless workflow tailored to your needs:
- Data extraction OCR: Automatically extract data from any type of document.
- Human-in-the-loop: Ensure almost 100% accuracy with our human-in-the-loop feature, allowing internal verification or support from Doxis’ data annotation team.
- Document conversion: Convert documents in any format – such as PDF, scanned images, or Word documents – into various business-ready data formats, including JSON, XLSX, CSV, TXT, XML, and more.
- Data anonymization: Protect sensitive information and ensure regulatory compliance by anonymizing privacy-sensitive data, such as personal information or contact details.
- Document verification: Authenticate documents automatically and identify fraudulent activity to reduce the risk of fraud.
At Doxis, we value privacy – all of our document workflows are HIPAA, GDPR, and ISO compliant, ensuring secure data processing. With peace of mind about data safety, take the next step and streamline your document workflows.
If you want to automate your workflow with Doxis’ intelligent document processing solution, don’t hesitate to contact our experts for additional information or book a free demo!
FAQ
You can extract data from a PDF to Excel by copying and pasting, using a PDF converter, importing directly through Excel’s built-in feature, or using automated document processing software. The right method depends on your document volume and complexity. For large or recurring workloads, automated software like Doxis AI.dp removes the need for any manual steps.
Can I extract data from a scanned PDF to Excel?
Yes, but not with most basic tools. Standard PDF converters and Excel’s import feature only work with native (digitally created) PDFs. To extract data from scanned documents, you need software with OCR (optical character recognition) capability, which reads the document as an image and converts it into structured, editable data.
What is the most accurate way to extract tables from a PDF?
For simple, native PDFs, tools like Tabula or Excel’s direct import give reasonable results. For complex tables, scanned documents, or high-volume processing, intelligent document processing software with OCR provides the highest accuracy and handles edge cases that simpler tools miss.
Does Excel have a built-in PDF import feature?
Yes. In Excel, go to Data > Get Data > From File > From PDF, select your file, and choose which table to import. It works well with clean, structured PDFs but struggles with multi-page documents and complex table layouts, often requiring manual cleanup after import.
How do I automate PDF to Excel data extraction?
Automation requires an intelligent document processing platform. You configure an input source (such as a cloud folder or email inbox), define the data fields you want to extract, and map those fields to columns in your Excel sheet. Once the flow is published, every new document is processed automatically without manual input. For a deeper look at the options available, see our comparison of the best PDF data extraction tools.
What types of PDFs can be automatically extracted?
Both native PDFs (created digitally) and scanned PDFs (photographed or printed documents saved as images) can be processed automatically, provided the software includes OCR capability. This covers invoices, receipts, bank statements, purchase orders, contracts, and most other common business documents.
Is automated PDF extraction secure?
Enterprise-grade document processing software applies encryption in transit and at rest, and is built to comply with data protection regulations including GDPR and HIPAA. Always verify that the platform you use holds relevant certifications before processing sensitive documents.
How long does it take to set up an automated PDF to Excel workflow?
A straightforward workflow with a single document type and output destination takes less than an hour to configure. More complex setups with multiple document types, custom fields, or advanced validation steps take longer, but are completed during an onboarding session with the vendor.