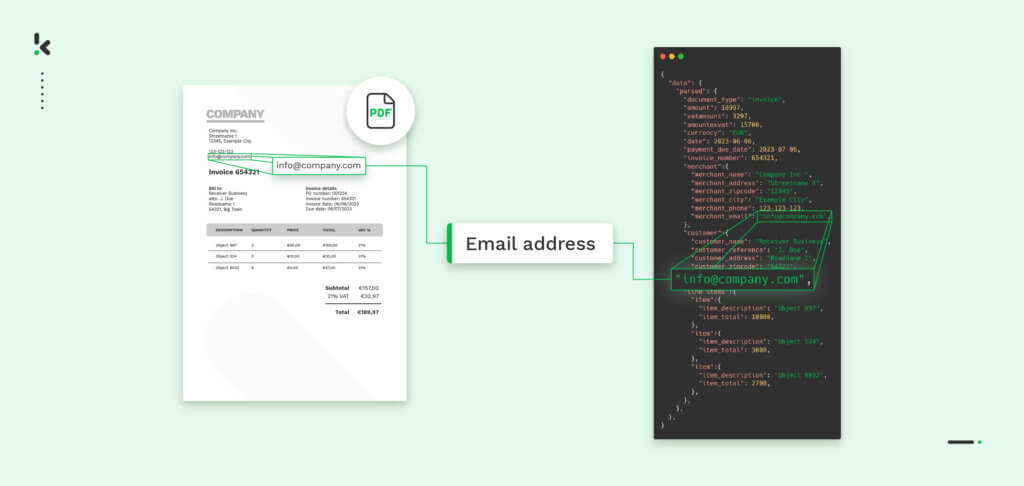

Are you a marketer, data analyst, or other person who tries to extract email addresses from PDF documents? We understand that it can be frustrating and time-consuming, especially when dealing with data in bulk.
Effectively managing email addresses in batches is essential for streamlined communication and outreach. Whether you’re working with just a few documents or managing an extensive collection, this article will guide you through the process of efficiently extracting email addresses from PDFs.
In this blog, you’ll find effective ways to extract email addresses from PDFs in batches, making your workflow simpler and more efficient. We’ll explore both manual and automated methods, making it easier for you to focus on what truly matters.
Let’s get started!
Quick Guide: 3 Ways to Extract Email Addresses from PDFs
Method 1 — Manual Search (Small Volumes)
- Open PDF File – Use Adobe Acrobat, Reader, or any PDF viewer.
- Search for “@” – Press Ctrl+F (Cmd+F on Mac) and type “@” in the search bar.
- Navigate Results – Use Next/Previous to locate each address.
- Copy & Paste – Transfer addresses into a text, CSV, or spreadsheet file.
Best for quick checks on a few documents.
Method 2 — Using a Free Email Extracting Tool (Medium Tasks)
- Choose a Tool – Examples include ASPOSE Email Extractor or other free online extractors.
- Upload Your PDFs – Drag and drop files or select from your computer.
- Start Extraction – Click “Extract,” and let the tool scan for valid email addresses.
- Download the Results – Save as TXT or CSV; optional email delivery of results.
Useful for moderate volumes but may have speed, limit, or security restrictions.
Method 3 — Automated Workflows (Large Volumes)
- Choose Automation Platform – Use Klippa DocHorizon, Power Automate, or custom scripts (Python/Google Apps) with regex.
- Define Rules – Map only the fields you need; apply deduplication filters.
- Connect Sources & Outputs – Link email extraction to Google Drive, Dropbox, or your ERP/CRM.
- Run & Monitor – Process hundreds or thousands of PDFs in bulk.
Ideal for ongoing, high‑volume document processing.
You can jump directly to each method by clicking the links below:
- Manual Extraction
- Using a Free Email Extracting Tool
- Extract Emails from PDFs Automatically with Klippa DocHorizon
Manually Extracting Email Addresses from PDFs
When you’re dealing with just a few documents, manual email extraction often feels quicker and easier than setting up an automated tool. No doubt, it works well for small tasks or when budgets are tight, and doing it by hand gives businesses the ability to double-check the data along the way.
If you prefer to extract email addresses from PDFs manually, we’ve got you covered! Just follow the steps below.
Step 1: Right-click on the PDF file containing the email addresses you want to extract.
Step 2: Open the PDF.
Step 3: Press “CTRL + F” to open the “Find” search option.
Step 4: Type the “@” sign in the search box. Use the “Next” and “Previous” buttons to navigate through the email addresses.
Step 5: Copy each email address one by one and paste them into a text file or spreadsheet.
You can follow these steps using any PDF viewer of your choice since most of them are widely available and easy to use.
Using a Free Email Extracting Tool
Manual extraction might do the trick for small tasks or when you’re keeping an eye on budget, but let’s be real – it can quickly lead to mistakes, wasted time, and frustration as your workload piles up.
Why not simplify the process?
Using a free online tool makes everything smoother. It reduces errors and handles larger volumes of data effortlessly, saving you and your team time for what really matters.
By using a free online email extracting tool, you can reduce the hassle and enhance accuracy and efficiency. In this section of the blog, we’ll explain how to do so by using the ASPOSE Email Extractor.
Let’s get started!
Step 1: Upload your file
Click in the upload area to choose files or drag and drop your documents.
Step 2: Extract email addresses
Click the EXTRACT button. The app will check the uploaded files and retrieve the email addresses.
Step 3: Get the results
The extracted addresses will be saved to a text file, and you’ll receive a download link immediately after the extraction.
Step 4: Get results by email
You can also email the result to yourself.
But let’s be honest.
While free online tools can be tempting, they often lack the convenience and peace of mind that an automated solution provides.
At first, the idea of “free” is very appealing, but then you’ll quickly find yourself exceeding free usage limits – even with just a few files – forcing you to upgrade to paid versions. These tools can also be frustratingly slow, wasting valuable time when you have important deadlines to meet. And let’s not forget the issue of data security – which is definitely a worry when you’re dealing with sensitive information.
Premium solutions, like Klippa DocHorizon, can handle larger amounts of data with impressive accuracy, reducing the mistakes that often happen with free online tools. Plus, they come with handy features, better security, and reliable customer support, so you can always work efficiently without worrying about unexpected costs or undermining data security.
Let’s explore this approach in more detail.
How to Extract Email Addresses from PDFs Automatically
Klippa DocHorizon is an advanced Intelligent Document Processing (IDP) platform designed to automate various document workflows, including the extraction of email addresses from PDF documents. The exciting news? You can try it out for free!
Let’s walk you through the process step by step.
1. Sign up on the platform
The first thing you have to do is sign up for free on the DocHorizon Platform. Simply enter your email address, and password, and then provide some details like full name, company name, use case, and volume. Once you’ve done that, you’ll receive a free credit of €25 to explore all the platform’s features and capabilities.
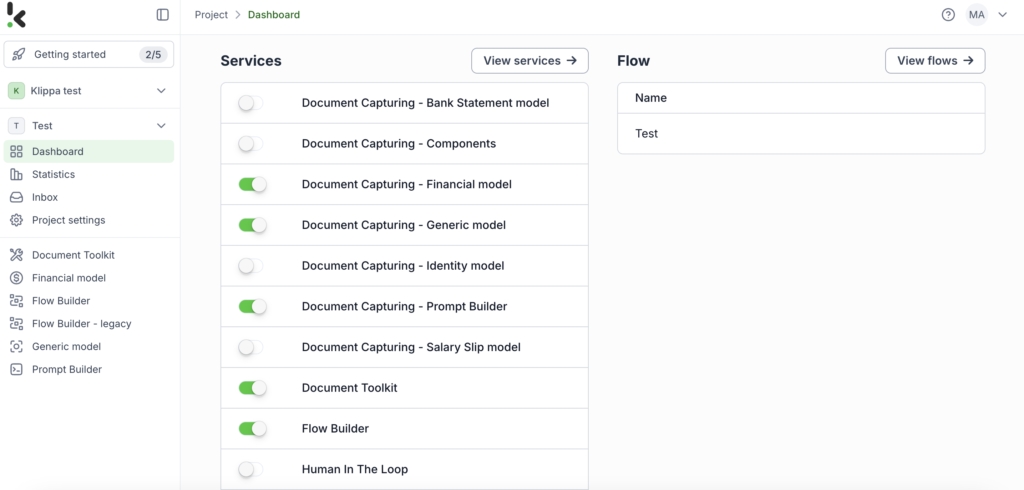
After logging in, create an organization and set up a project to access our services. For our goal – extracting email addresses from PDFs – simply enable the Prompt Builder service to get started. This setup ensures you have everything you need right from the start!

2. Create a new prompt configuration
The Prompt Builder is a user-friendly data-extraction tool that works just like a chatbot. Want to find something in a document? In our case, just type, “What is the email address in this PDF file?” and get the answer instantly. With the Prompt Builder, creating custom models to extract specific data from any document is easy.
To configure it, follow these steps:
- Once you’re on the platform, click on the dashboard, and you will see all services available.
- Create a new prompt using the Prompt Builder. This tool automatically searches for the desired data, like email addresses.
- Give your prompt a name (in our case, “Email from PDF”), and keep the default settings.
- On the prompt configuration page, specify the fields you want to extract, such as email addresses.
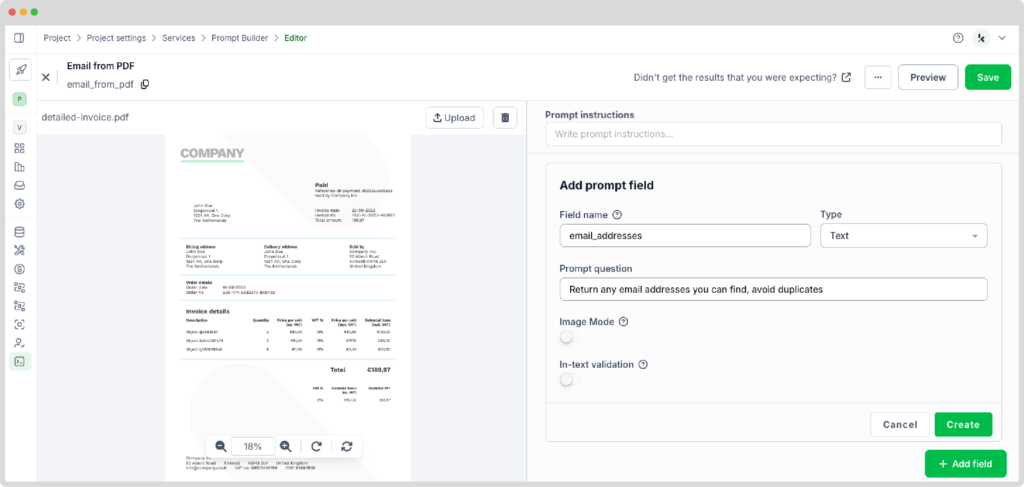

Here’s a tip: In the prompt question section, be specific and mention that you don’t want duplicates. This helps you get exactly what you need. It’s important to change the type section too. If you leave it as ‘text’ (the default), you’ll only get one email address. Since a document might have several, switch it to ‘text list’ so you can retrieve multiple email addresses at once.
3. Select your input source
To extract email addresses from PDF files, start by selecting the source of the PDFs. You can upload files directly from your device or connect to over 100 external sources like Google Drive, Dropbox, Outlook, Box, Salesforce, Zapier, OneDrive, your company’s database, or even cloud storage solutions like Amazon S3 and iCloud. Make sure all relevant PDFs are stored in a specific folder so they can be processed in bulk if needed.
For this example, create a folder named “Input” in Google Drive and upload your PDF documents there.
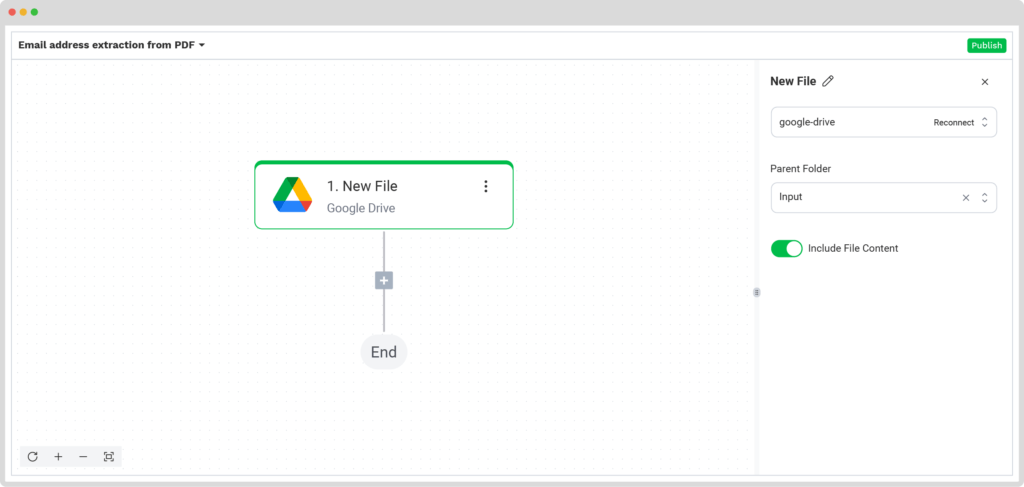
Next, go to the left-side configuration window in the Platform and select “Flow Builder” → “New Flow”. Give your flow a name, such as “Email address extraction from PDF”.
After that, select your input source by choosing “Google Drive” → “New File” as your trigger. On the right side, complete the following sections:
- Connection: You can assign any name to your connection. For example, we named ours “google-drive”. After naming, the system will request you to authenticate with Google.
- Parent Folder: Input
- Include File Content: Check this box to ensure file content is processed.

4. Capture and extract data
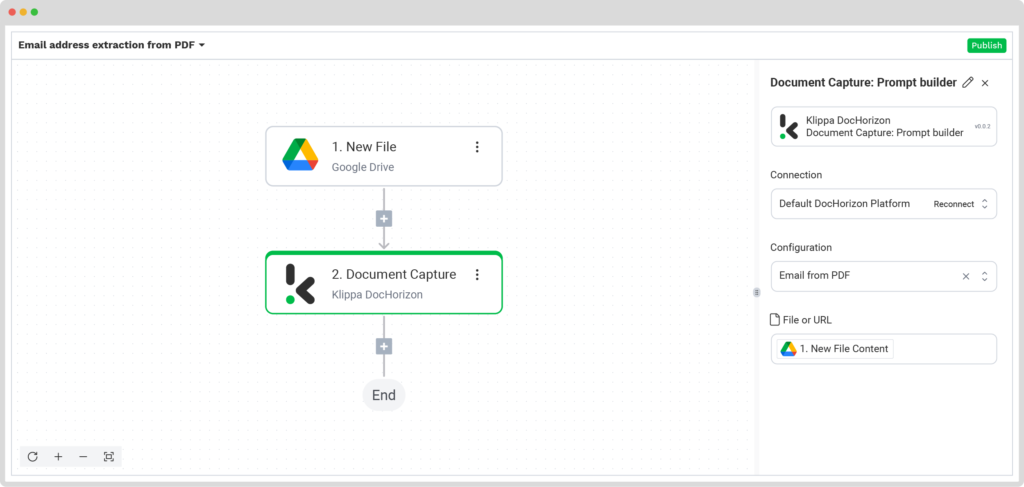
For this step, we will use the previously created Prompt to extract email addresses from all new documents in the input folder. The platform uses Optical Character Recognition (OCR) technology to automatically scan each document for email patterns, searching for text that contains the “@” symbol to identify email addresses.
In the Flow Builder, select the following settings:
- Connection: Default DocHorizon Platform
- Configuration: The name of your Prompt (in our case, “Email from PDF”)
- File or URL: New file → Content

5. Save the file
Once the extraction process is complete, you can choose what to do with the email addresses extracted from the documents. For example, you can compile them into a Google Sheet that you’ve already set up, named “Export-email-pdf”.
To proceed, follow these steps in the Platform:
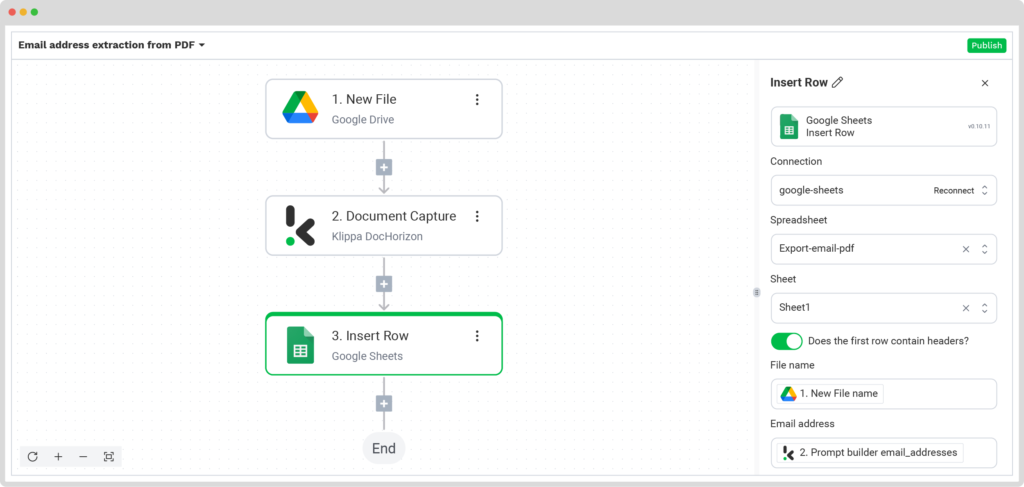
- Select Google Sheets from the search bar and choose Insert Row.
- On the right side, fill in the following fields:
- Connection: google-sheet
- Spreadsheet: Export-email-pdf (the name of your output file)
- Sheet: Select a Sheet (in our case is Sheet1)
Tip: If your output sheet has headers, enable the “Does the first row contain headers?” option to let the platform know that row 1 is occupied.
Then, another section will appear with the name of the header in your output file (in our case, the name is “Email address”), and from there, you choose Prompt Builder → Components → Email address.

Congratulations! The extraction is complete, and you can now view all the extracted email addresses in your Google Sheet. With this one-time setup, simply publish the flow, and any new files added to the folder will be processed automatically – saving you time and keeping your data organized effortlessly.
Why Should You Use Klippa To Automate Email Extraction?
With Klippa DocHorizon, extracting email addresses from PDFs becomes both easy and accurate. Our Intelligent Document Processing (IDP) platform enables you to automate nearly any workflow seamlessly.
By leveraging Klippa’s advanced data extraction capabilities, you get to:
- Customize your email extraction workflows to gain complete control over how you handle email data from your documents.
- Set up your input and output channels and easily connect our platform with your existing tools using more than 50 integrations.
- Achieve up to 99% data extraction accuracy, automating email extraction and reducing manual input.
- Improve data management through organized workflows, simplifying the processes of searching, retrieving, and analyzing extracted emails.
- Process PDFs globally, supporting over 100 languages and various document types
Ready to get started? Book a free demo below or connect with our experts to get all your questions answered!
FAQ
Open the PDF in a viewer like Adobe Acrobat, press Ctrl+F, search for “@”, and copy each found address into a text, CSV, or spreadsheet file.
For bulk extraction, use automated platforms like Klippa DocHorizon, which can process hundreds or thousands of PDFs and export results to CSV, Excel, or Google Sheets.
Free tools often lack encryption or compliance features. For sensitive data, use a secure, GDPR‑compliant solution like Klippa DocHorizon.
Yes. OCR technology in Klippa can accurately detect email addresses from scanned or image-based PDFs.
Klippa DocHorizon can reach up to 99% accuracy, especially when documents are text-based and prompts are configured to remove duplicates.
Yes. With Klippa’s Prompt Builder, you can configure the extraction to return only unique addresses, removing duplicates automatically.
You can export to CSV, Excel, TXT, JSON, or XML, and send results directly to integrated applications like Google Sheets or your CRM.
Yes. Klippa processes PDFs in over 100 languages, detecting email patterns even in mixed‑language documents.
Yes. Klippa connects with over 50 integrations, including Google Drive, Dropbox, Outlook, Salesforce, Zapier, and ERP/CRM systems.
Yes. Klippa offers €25 in free credits, allowing you to try automated email extraction and bulk workflows before committing.